반응형
Shiny를 이용해서 페이지를 만들다 보면 아쉬운 상황이 발생합니다.
예를 들어 TextInput에서 label과 value의 간격이 너무 벌어져있는 등 많은 점이 있습니다.
이때에는 주로 css를 추가해서 변경해주면 됩니다.
처음 저는 R,python 만 찔끔 할줄 알아서 어찌해야하는지 찾아보던 찰나!!
CSS를 써봐야한다는 말을 들어서 호다닥 찾아 보았습니다.
css의 경우 tags$style이라는 것을 이용하여 추가하면 되고,
div()를 통해서 적용될 Text를 적어주시면 됩니다!
다음과 같은 예시를 보여드립니다.
library(shiny)
library(shinydashboard)
ui<-dashboardPage(
  dashboardHeader(title = 'Variant table'),
  sidebar = dashboardSidebar(
    # 1. color name
    div(id='s_text1',textInput('test',label = 'Color test 1')),
    tags$style(type='text/css', "#s_text1 {color: red}"),
    # 2. HEX value
    div(id='s_text2',textInput('test',label = 'Color test 2')),
    tags$style(type='text/css', "#s_text2 {color: #ff0000}"),
    # 3. rgb value
    div(id='s_text3',textInput('test',label = 'Color test 3')),
    tags$style(type='text/css', "#s_text3 {color: rgb(255,0,0)}"),
    # 4. line height
    div(id='s_text4',textInput('test',label = 'Line height')),
    tags$style(type='text/css', "#s_text4 {line-height: 0.1em}"),
    # 5. letter ̄spacing
    div(id='s_text5',textInput('test',label = 'letter spacing')),
    tags$style(type='text/css', "#s_text5 {letter-spacing: 3px}"),
    # 6. word height
    div(id='s_text6',textInput('test',label = 'word spacing 1')),
    tags$style(type='text/css', "#s_text6 {word-spacing : 15px}")
  ),
  dashboardBody(
    div(id='b_text1',tags$h1('h1 test')),
    tags$style(type='text/css','#b_text1 {color :blue}'),
    tags$h2('h2 test'),
    tags$h3('h3 test'),
    tags$h4('h4 test'),
    tags$h5('h5 test'),
    tags$h6('h6 test')
  )
)

server<-function(input,output){}
shinyApp(ui,server)
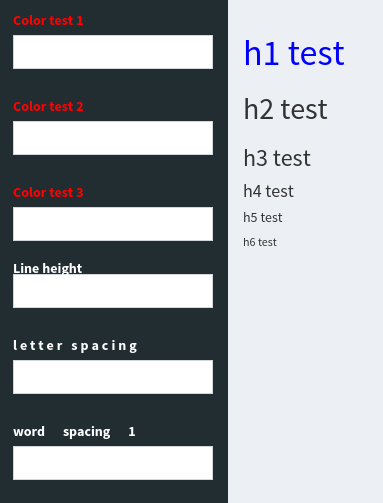
그 결과

다음과 같이 나왔습니다.
한번 실제로 해보시고 응용해서 적용해보세요!
유용하셨거나, 잘 보셧다면 주변 광고 한번씩만 클릭 부탁드립니다! 감사합니다!
728x90
반응형
'실용적인프로그래밍 > R' 카테고리의 다른 글
| [R][Shiny] shiny 앱 실행시 발생하는 에러 해결! (0) | 2020.12.18 |
|---|---|
| [R] 차원축소 PCA, PCoA (MDS) 실습 데이터 유사도! (0) | 2020.12.05 |
| [R][shiny] Shiny에서 사용가능한 html들! (0) | 2020.10.12 |
| [R][shiny] Shiny app 집에서 돌려보세! (0) | 2020.10.09 |
| [R] RMysql Package 속도 최적화 방법 (0) | 2020.10.06 |


댓글